
The Role of Custom Jigs Design in Manufacturing
In manufacturing, precision and efficiency are key. You need tools that help you maintain quality while speeding up production. Custom jigs play a vital role in achieving this balance. They guide tools and parts during manufacturing processes, ensuring accuracy and repeatability. If you want to improve your production line, understanding the role of custom jigs design is essential.
How Custom Jigs Design Enhances Manufacturing Efficiency
Custom jigs are specially made tools designed to fit specific parts or operations. Unlike generic tools, they are tailored to your exact needs. This customization helps reduce errors and speeds up assembly or machining tasks.
For example, in aerospace manufacturing, where parts must meet strict tolerances, a custom jig can hold components firmly in place. This prevents movement during drilling or welding, resulting in consistent, high-quality parts. Similarly, in automotive production, custom jigs help align body panels perfectly, reducing rework and scrap.
Using custom jigs also means less reliance on operator skill. The jig guides the tool or part, so even less experienced workers can produce accurate results. This leads to fewer mistakes and higher throughput.
Here are some key benefits of custom jigs design:
Improved accuracy: Jigs ensure parts are positioned correctly every time.
Increased speed: They reduce setup time and simplify complex tasks.
Consistency: Parts produced with jigs have uniform quality.
Reduced waste: Fewer errors mean less material scrap.
Enhanced safety: Jigs can hold parts securely, reducing the risk of accidents.

Key Considerations in Custom Jigs Design
Designing a custom jig requires careful planning. You must consider the part geometry, manufacturing process, and production volume. A well-designed jig fits the part perfectly and supports the tool’s movement without interference.
Start by analyzing the part’s critical features. Identify where the jig needs to hold or guide the part. For example, if you are drilling holes, the jig should have bushings to guide the drill bit precisely.
Material choice is also important. The jig must be durable enough to withstand repeated use but not so heavy that it becomes cumbersome. Common materials include steel, aluminum, and sometimes high-strength plastics.
Another factor is ease of use. The jig should be simple to load and unload. Quick-release clamps or pins can speed up the process. If the jig is too complex, it may slow down production instead of helping.
Finally, consider maintenance. Jigs can wear over time, especially at contact points. Designing for easy inspection and replacement of wear parts will keep your production running smoothly.
If you want to explore more about custom jigs and fixtures design, you can find detailed resources and expert services that help optimize your manufacturing processes.
What is the 3 2 1 Principle of Jig Fixture Design?
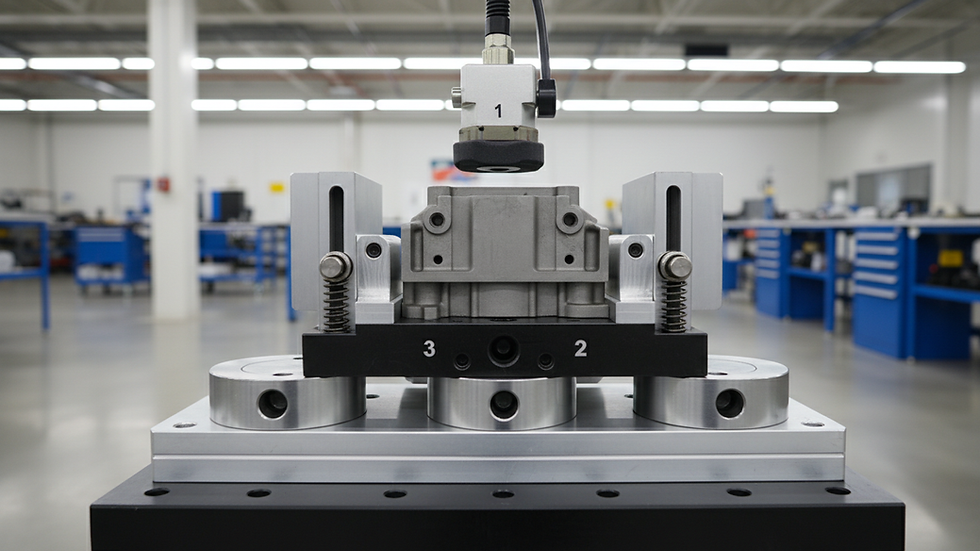
The 3 2 1 principle is a fundamental concept in jig and fixture design. It ensures that a part is fully constrained in three-dimensional space, preventing any unwanted movement during manufacturing.
Here’s how it works:
3 points: The part is first located on three points, usually on a flat surface. This fixes the part in one plane.
2 points: Next, two points are used to locate the part along a second plane, usually perpendicular to the first.
1 point: Finally, one point locates the part along the third plane, completing the constraint.
This method prevents the part from moving in any direction - up/down, left/right, or forward/backward. It also stops rotation around any axis.
Applying the 3 2 1 principle helps you design jigs that hold parts securely without over-constraining them. Over-constraint can cause stress or deformation, leading to inaccuracies.
For example, in marine engineering, when fabricating hull components, using the 3 2 1 principle ensures that each piece fits perfectly during assembly. This reduces the need for adjustments and speeds up the build process.
Understanding this principle is crucial for anyone involved in jig design. It provides a clear framework to create effective, reliable fixtures.
Practical Applications of Custom Jigs in Various Industries
Custom jigs are used across many sectors, each with unique requirements. Let’s look at some examples:
Aerospace: Precision is critical. Custom jigs hold complex parts like turbine blades or fuselage sections during machining and assembly. This ensures tight tolerances and reduces inspection time.
Oil & Gas: Large, heavy components require jigs that can support weight and allow for welding or drilling in difficult positions. Custom jigs improve safety and accuracy on these projects.
Automotive: From engine parts to body panels, jigs help maintain alignment and speed up assembly lines. They also reduce variability between vehicles.
Marine: Shipbuilding involves large, curved parts. Custom jigs hold these parts in place for welding and fitting, ensuring the final structure is strong and watertight.
In all these industries, custom jigs reduce manual adjustments and rework. They also help meet strict quality standards and regulatory requirements.
If you manage complex projects, investing in custom jigs can save time and money. It also improves your reputation for delivering high-quality products consistently.
Tips for Implementing Custom Jigs in Your Manufacturing Process
If you’re considering adding custom jigs to your workflow, here are some practical tips:
Start with a clear goal: Define what problem the jig will solve. Is it improving accuracy, speeding up production, or reducing waste?
Involve your team: Operators and engineers who use the jig daily can provide valuable insights.
Prototype and test: Build a prototype jig and test it on actual parts. Make adjustments based on feedback.
Train your staff: Ensure everyone knows how to use the jig correctly to maximize benefits.
Plan for maintenance: Schedule regular inspections and replace worn parts promptly.
Document the process: Keep records of jig designs, usage instructions, and maintenance logs.
By following these steps, you can smoothly integrate custom jigs into your manufacturing process and see measurable improvements.
Looking Ahead: The Future of Custom Jigs in Manufacturing
As manufacturing technology evolves, so do custom jigs. Advances in materials, 3D printing, and automation are changing how jigs are designed and used.
For example, 3D printing allows rapid production of complex jig components that were previously difficult or expensive to make. This means you can create highly customized jigs faster and at lower cost.
Automation and robotics also benefit from custom jigs. Robots rely on precise positioning, and jigs provide the repeatability needed for automated tasks.
In the future, you may see smart jigs equipped with sensors that monitor part positioning and tool wear in real time. This data can help optimize production and reduce downtime.
Investing in modern custom jigs design today prepares you for these innovations. It keeps your manufacturing competitive and ready for the challenges ahead.
Custom jigs are more than just tools - they are essential partners in your manufacturing success. By understanding their role and applying best practices in design and use, you can improve quality, efficiency, and safety across your projects. Whether you work in aerospace, oil & gas, automotive, or marine engineering, custom jigs help you meet demanding standards and deliver outstanding results.


Comments